User Guide

Get your first Google reviews, step by step

A friendly, screenshot-by-screenshot walkthrough of ReviewAI: from creating your account to watching new reviews roll in. Setup takes about five minutes and you never need to write a review yourself.

Overview

How ReviewAI works

ReviewAI turns a happy customer into a Google review in under a minute. You set things up once; your customers do the rest by scanning a QR code.
  1. Step 1

    Set up your business

    Add your business, services and Google Maps location. Takes about five minutes.

  2. Step 2

    Display your QR code

    Download the QR code and place it at the counter, on tables or on receipts.

  3. Step 3

    Customers scan and pick

    They rate their visit, choose an AI-written review, and paste it into Google.

  4. Step 4

    Watch the results

    See scans, reviews and ratings per location in your analytics.

How to read the screenshots: every orange outline carries a number. The same number appears in the list next to the screenshot and explains what that part of the screen does.

Before you begin

  • An email address (or a Google account) to sign up with.
  • Your business's listing on Google Maps. Reviews are posted there.
  • Optional: your logo (JPG, PNG or WebP, up to 2 MB).

Who this guide is for

Sections 1–7 are for business owners who manage ReviewAI. Section 8 shows what your customers see, so you know exactly what to tell your staff.

Part 1

Create your account

Go to reviewai.cc/dashboard/auth/register. You can sign up with Google or with an email address.

Sign up

Create Account

Pick whichever option is quicker for you. Both lead to the same setup flow.
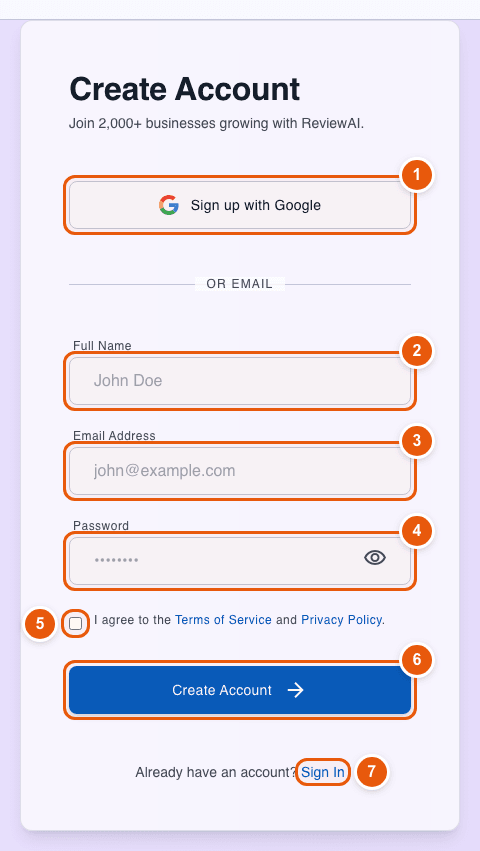
ReviewAI Create Account form with numbered markers on each field
  1. Sign up with Google. One tap, no password to remember.

  2. Full name. Shown inside your dashboard.

  3. Email address. Use an address you check regularly. It is your login.

  4. Password. Use the eye icon to check what you typed.

  5. Terms checkbox. Tick to accept the Terms of Service and Privacy Policy.

  6. Create Account. Creates your account and starts the 4-step setup.

  7. Sign In link. Already registered? Go to the sign-in page instead.
Returning

Sign in

Next time, sign in from the same address with the method you used to register.
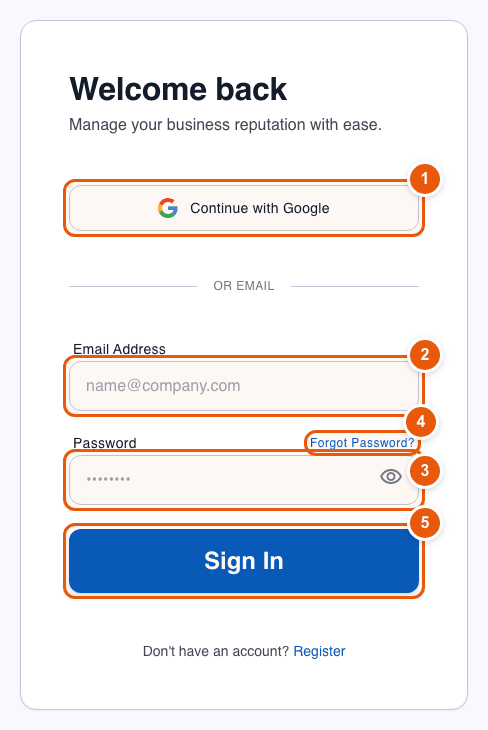
ReviewAI sign-in form with numbered markers
  1. Continue with Google. For accounts created with Google.

  2. Email address. The email you registered with.

  3. Password. Use the eye icon to reveal it.

  4. Forgot Password?. Type your email address first, then click it. We email a link to reset your password.

  5. Sign In. Takes you to your dashboard.

Part 2

Set up your business in 4 steps

After you register, a progress bar at the top shows where you are. You can go back to any earlier step without losing what you entered.

Step 1 of 4

Tell us about your business

This information is what ReviewAI uses to write reviews that sound like they belong to your business.
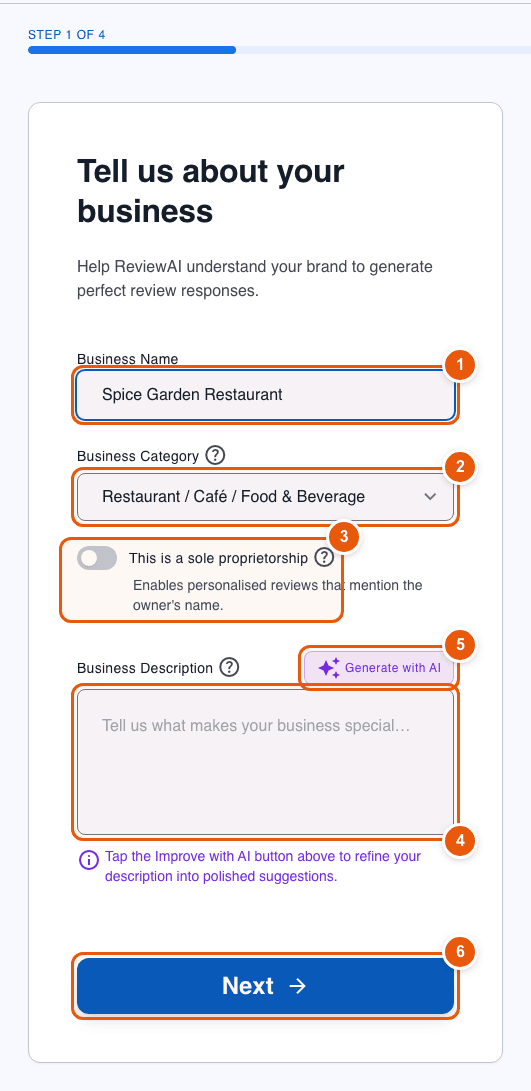
Onboarding step 1: business name, category, description and Generate with AI button, numbered
  1. Business name. The name customers know you by, for example “Spice Garden Restaurant”.

  2. Business category. Choose the closest match. It decides which services you can pick in step 2, and it cannot be changed later.

  3. Sole proprietorship. Switch this on if you are the owner-operator. Reviews can then mention the owner by name.

  4. Business description. A sentence or two about what makes you special. Write your own or let AI help.

  5. Generate with AI. Creates three description ideas from your name and category.

  6. Next. Saves this step and moves on.

Tip: Not sure what to write? Type just your business name, choose the category and press Generate with AI.

Step 1 of 4 · AI help

Pick an AI-written description

Suggestions appear on the right in a few seconds. Click one to copy it into your description, then edit it if you like.
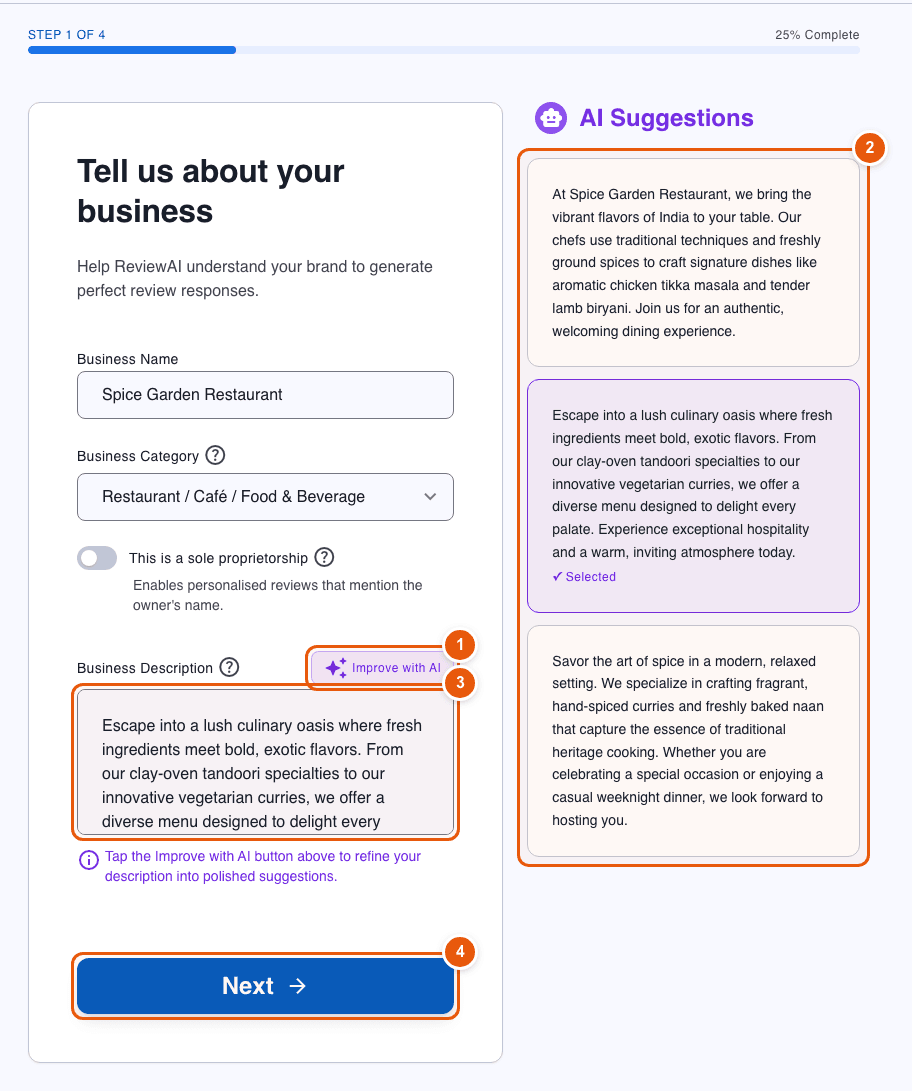
Onboarding step 1 after clicking Generate with AI, showing three AI description suggestions
  1. Generate / Improve with AI. Once you have text, the button changes to “Improve with AI”. Press it again for fresh ideas.

  2. AI suggestions. Click any card. The one you choose shows “Selected”.

  3. Your description. The chosen text lands here and stays fully editable.

  4. Next. Continue when you are happy with the description.

Step 2 of 4

What do you offer?

Pick the products and services you want customers to be able to mention. ReviewAI weaves them into the review suggestions.
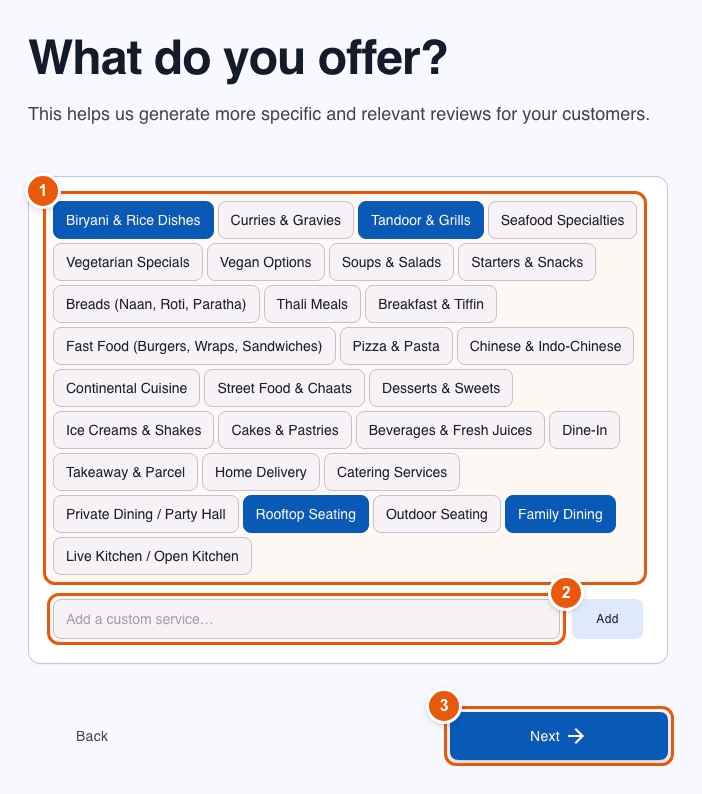
Onboarding step 2: choose the products and services you offer
  1. Service chips. Tap to select (blue) or tap again to remove. The list is tailored to your category.

  2. Custom service. Not in the list? Type your own and press Add.

  3. Next. Saves your business and services, then moves to the location step.

Good to know: More specific services lead to more specific reviews. Choose the ones you are proud of rather than everything.

Step 3 of 4

Add your location

A location is one physical branch. Each location gets its own QR code, settings and analytics.
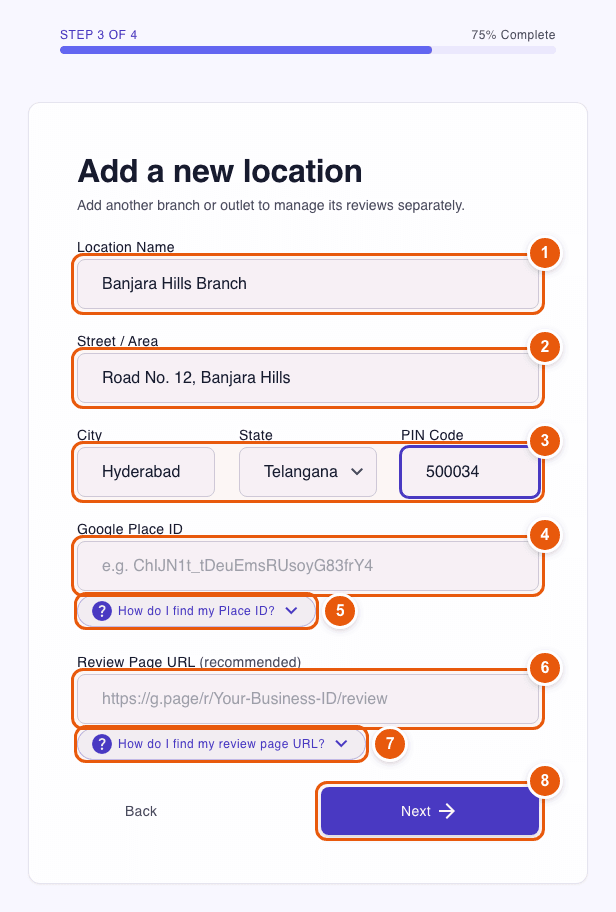
Onboarding step 3: location form with Google Place ID and Review Page URL fields
  1. Location name. For example “Banjara Hills Branch”. Customers see this on the review page.

  2. Street / Area. The street address or area of the branch.

  3. City, state and PIN code. Used to add local flavour to reviews when SEO mode is on.

  4. Google Place ID. A unique ID for your Google listing.

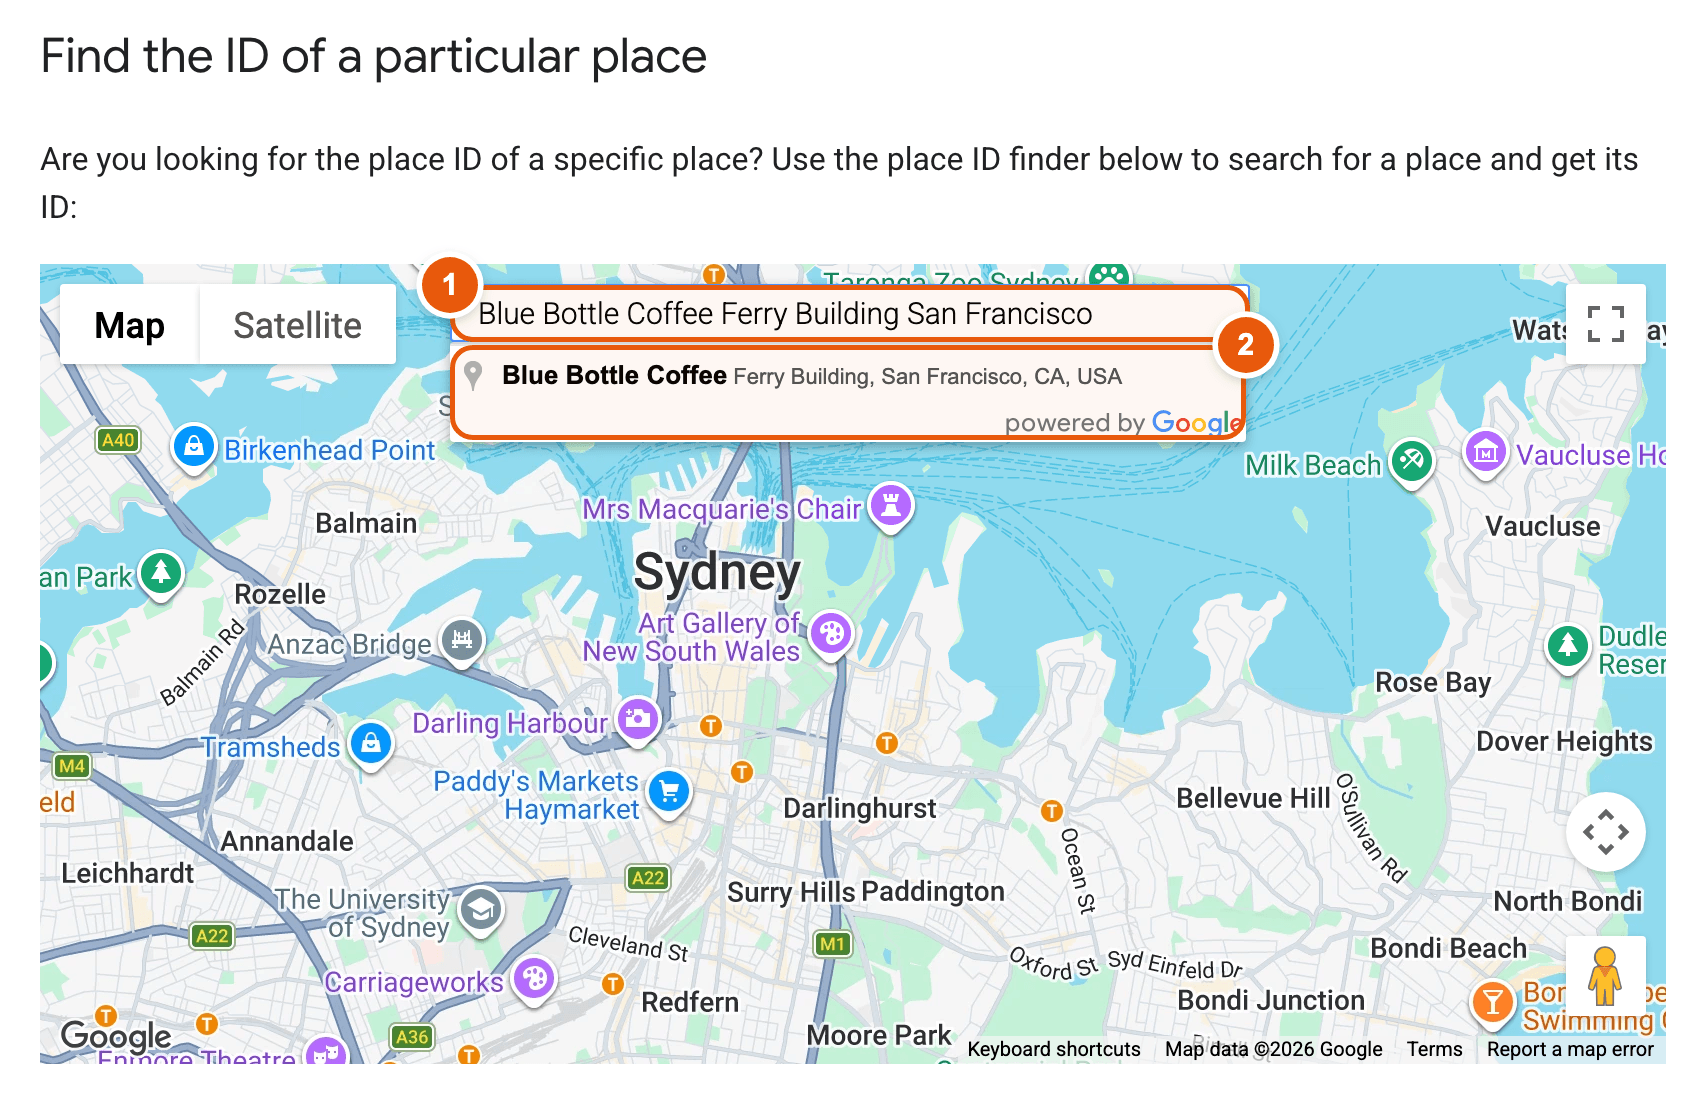
  5. How do I find my Place ID?. Click it to open short instructions right under the field. The first section below shows the same steps with screenshots.

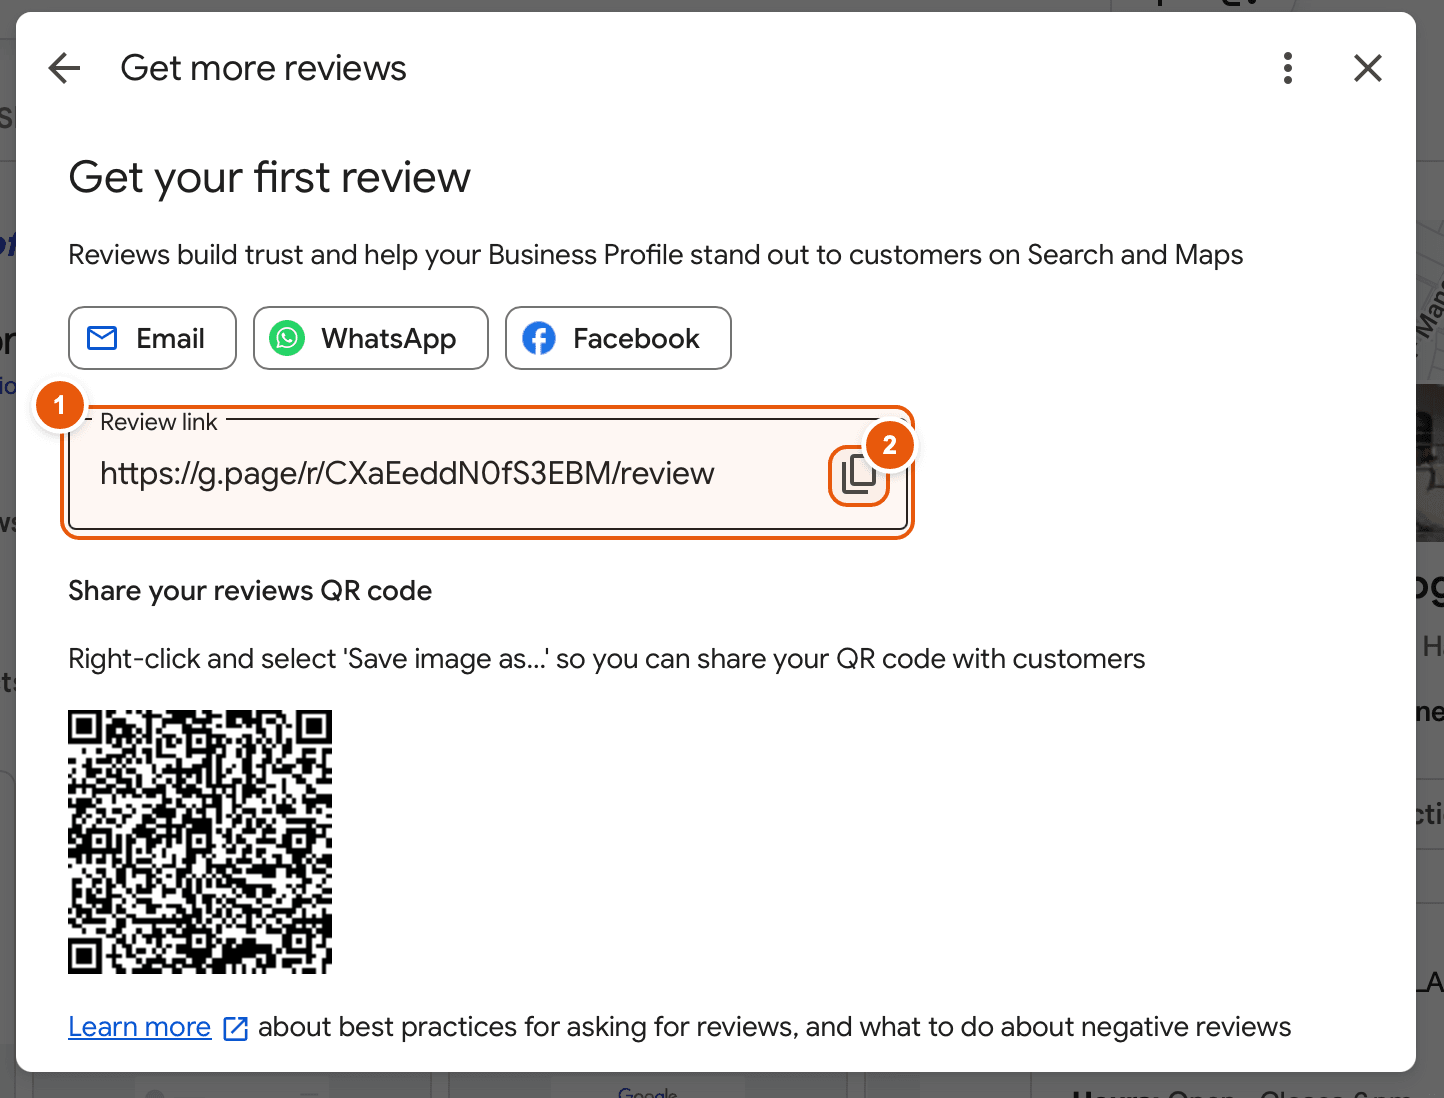
  6. Review Page URL (recommended). Google’s direct review link for your business. It takes customers straight to the write-a-review box.

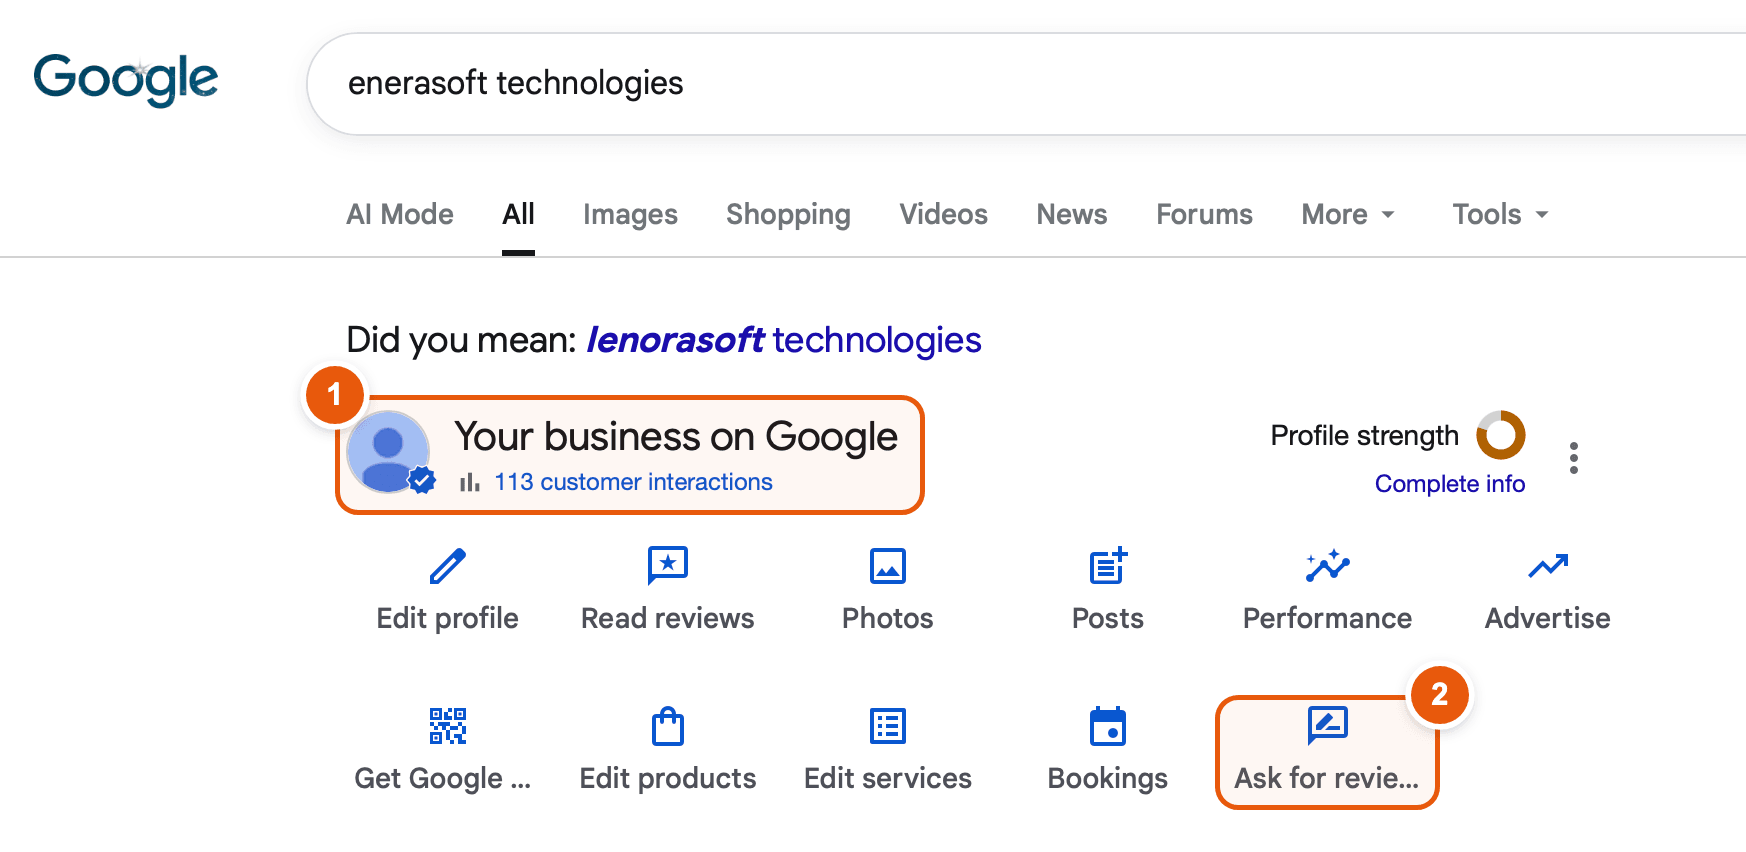
  7. How do I find my review page URL?. Click it for the exact clicks to copy the link from Google. The next section shows them with screenshots.

  8. Next. Creates the location and generates its QR code.

Tip: To get the Place ID, use Google’s Place ID Finder (steps with screenshots in the next section, or the dedicated page). To get the review page URL: search for your business on Google, click Ask for reviews and copy the Review link. The next section walks through it with screenshots, or open the dedicated page.

Step 3 of 4 · Google Place ID

Find your Google Place ID

Copy this from Google’s Place ID Finder, then paste it into the Google Place ID field above. Also available as a stand-alone page.

On Google · Step 2

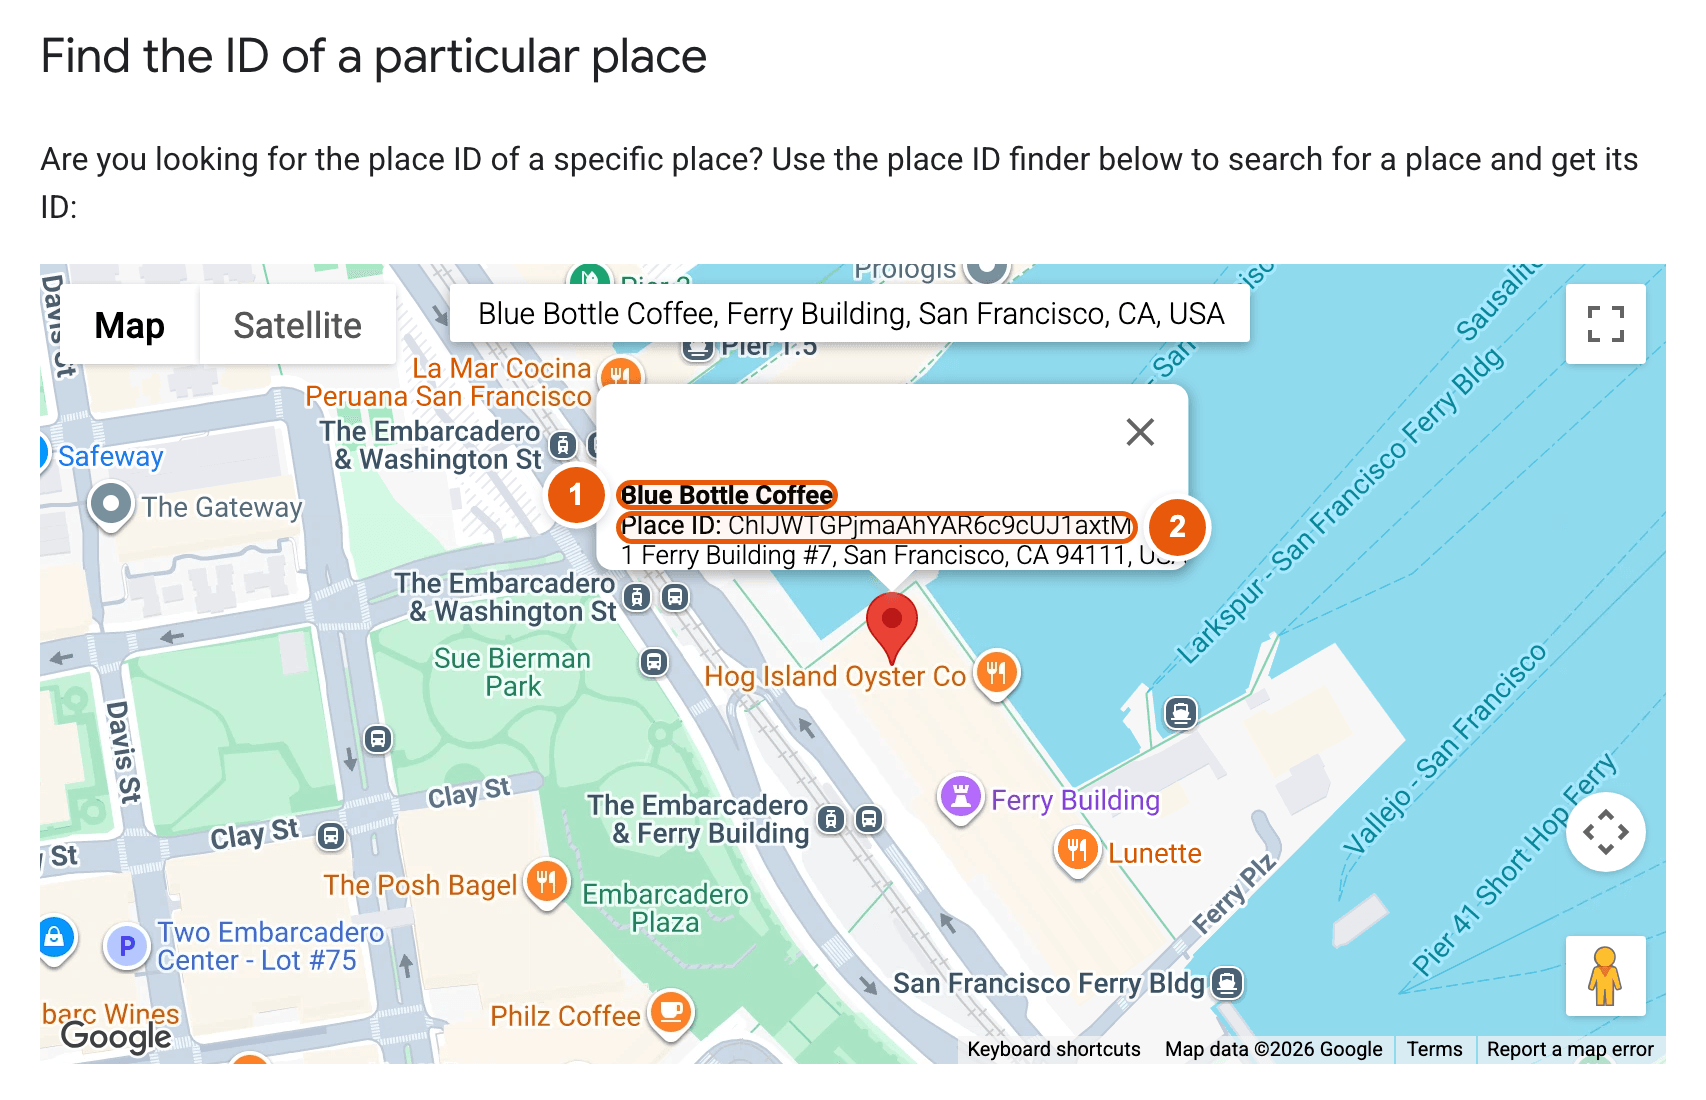
Copy the Place ID from the popup

The map jumps to your business and a small popup opens above the pin. The Place ID is the long code on the second line.
Place ID Finder map with the business popup showing its name and Place ID highlighted
  1. Business name and address. Check that the name and address match your branch before you copy anything.

  2. Place ID. It starts with “ChIJ” and is about 27 characters long. Double-click it, or drag across it, then copy it with Ctrl+C (Cmd+C on Mac).

Tip: Copy only the code, without the words “Place ID:”. Paste it into the Google Place ID field in ReviewAI.

Step 4 of 4

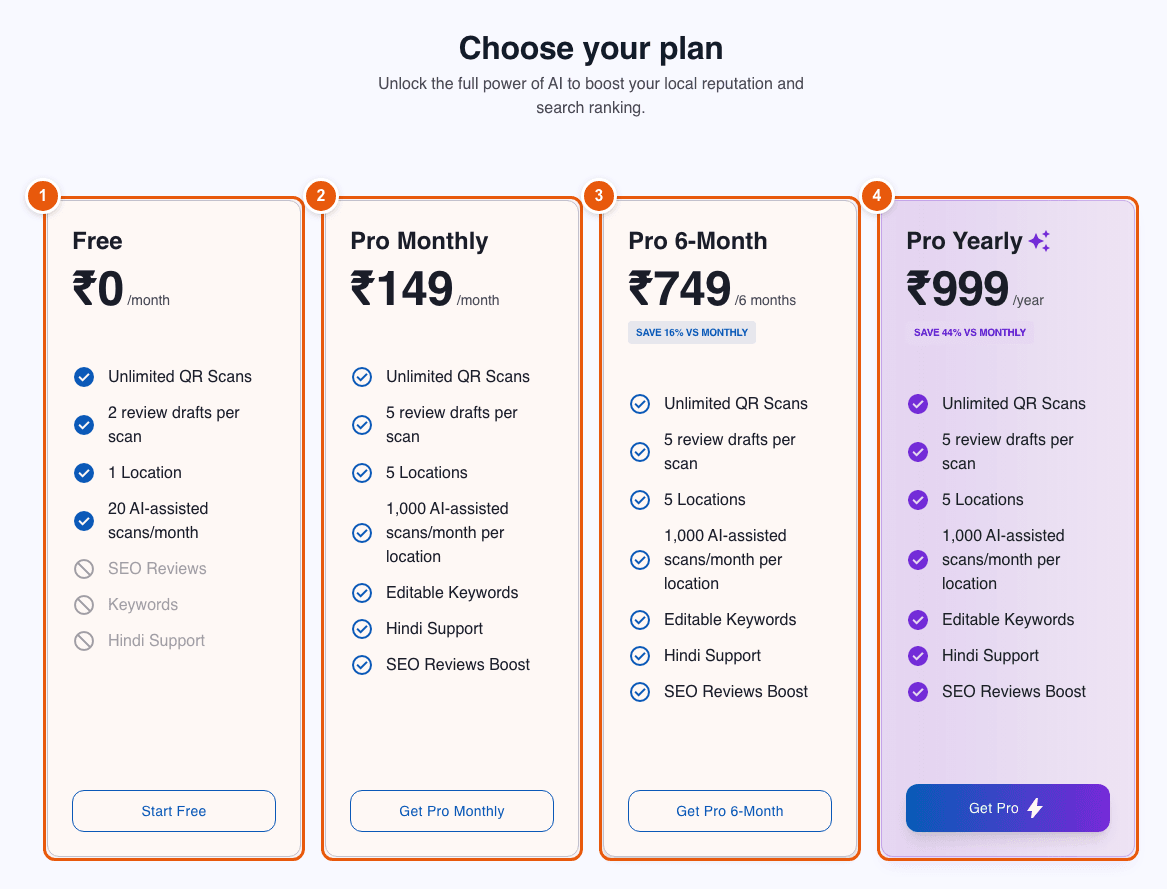
Choose your plan

Start free and upgrade whenever you need more. You can change plans later from the Subscription page.
Onboarding step 4: choose between the Free, Pro Monthly, Pro 6-Month and Pro Yearly plans
  1. Free. ₹0. 1 location, 2 review suggestions per scan, 20 AI-assisted scans a month, English only.

  2. Pro Monthly. ₹149 a month. Up to 5 locations, 5 suggestions, 1,000 AI-assisted scans per location, keywords, SEO mode, tone and Hindi.

  3. Pro 6-Month. ₹749 every six months. Same features, 16% cheaper than monthly.

  4. Pro Yearly. ₹999 a year. Same features, 44% cheaper than monthly. The best value.

Good to know: Choosing Start Free takes you straight to your dashboard.

Part 3

Your dashboard

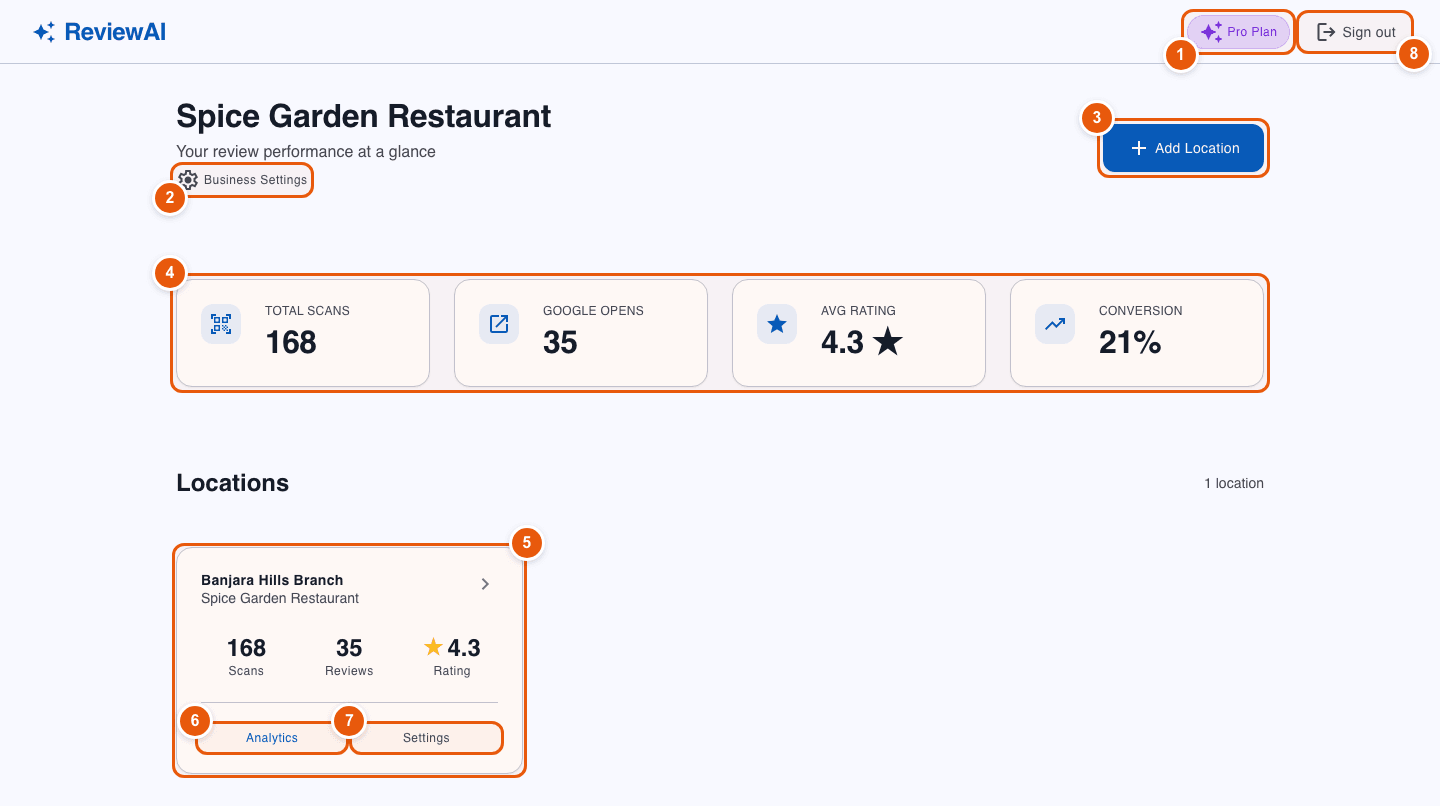
The dashboard is home base. It shows how all your locations are doing at a glance and links to everything else.

Dashboard overview

Totals are summed across all your locations.
Owner dashboard with plan badge, totals and a location card, numbered
  1. Plan badge. Shows your current plan. It is the quickest way to check whether Pro features are active.

  2. Business Settings. Edit your logo, description and ownership details.

  3. Add Location. Add another branch. The Free plan allows one location, Pro allows five.

  4. Summary cards. Total scans, Google opens (customers sent to Google), average rating and conversion (reviews as a share of scans).

  5. Location card. Click anywhere on the card to open that location and its QR code.

  6. Analytics. Open detailed charts for this location.

  7. Settings. Customise how AI writes reviews for this location.

  8. Sign out. Ends your session on this device.

Part 4

Get and use your QR code

The QR code is the heart of ReviewAI. Every location has its own.

Location page

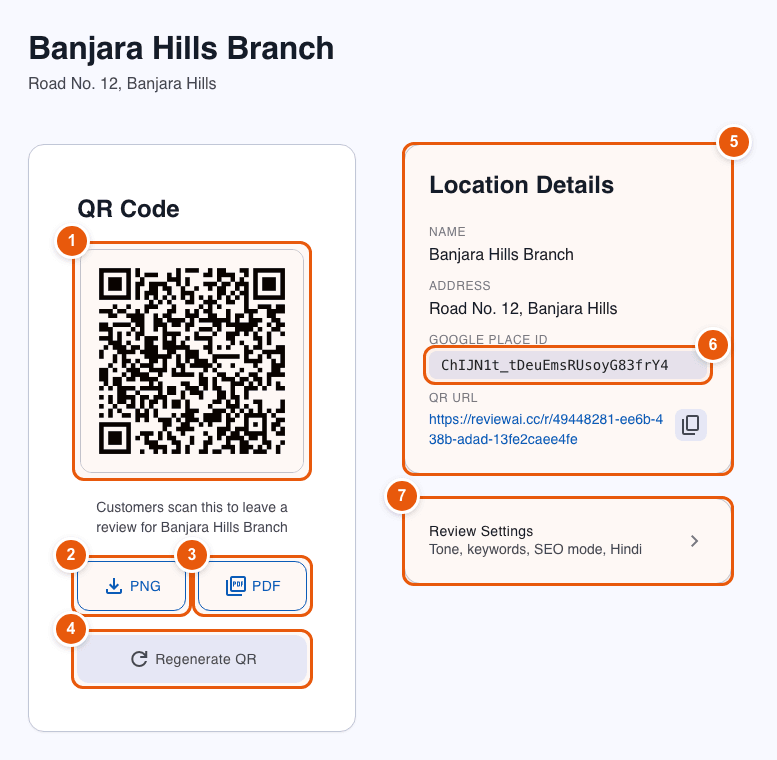
Open a location from the dashboard to see its QR code, review link and quick settings.
Location page with the QR code, PNG and PDF download buttons and the review link
  1. QR code. Customers scan this with their phone camera. No app needed.

  2. PNG. Download as an image for social posts, WhatsApp or digital screens.

  3. PDF. Download a PDF version that is ready to print for tent cards, stickers or posters.

  4. Regenerate QR. Creates a brand-new QR code and link. Only use this if the old code was shared by mistake.

  5. Location details and review link. Use the copy icon to share the link by message or email, without printing anything.

  6. Google Place ID. The Google listing this location is connected to.

  7. Review Settings. Jump to tone, keywords and other options (next section).

Important: Regenerating a QR code switches the location to a new link. Printed copies of the old code stop working, so reprint them before you regenerate.

Where to place your QR code

  • At checkout. Customers are happiest right when they pay. Put a tent card by the till.
  • On tables or counters. Easy to scan while waiting for the bill.
  • On receipts and packaging. Reaches takeaway and delivery customers.
  • Ask in person. A friendly “Would you mind leaving us a quick review? It takes under a minute” works best.

Print the code at least 2 × 2 inches (5 × 5 cm) on a plain, high-contrast background so it scans on the first try.

Part 5

Customise your AI reviews

Open Review Settings from the location page or the dashboard card. Changes apply to the next customer who scans. Remember to press Save Settings.

Review Settings · General

General settings

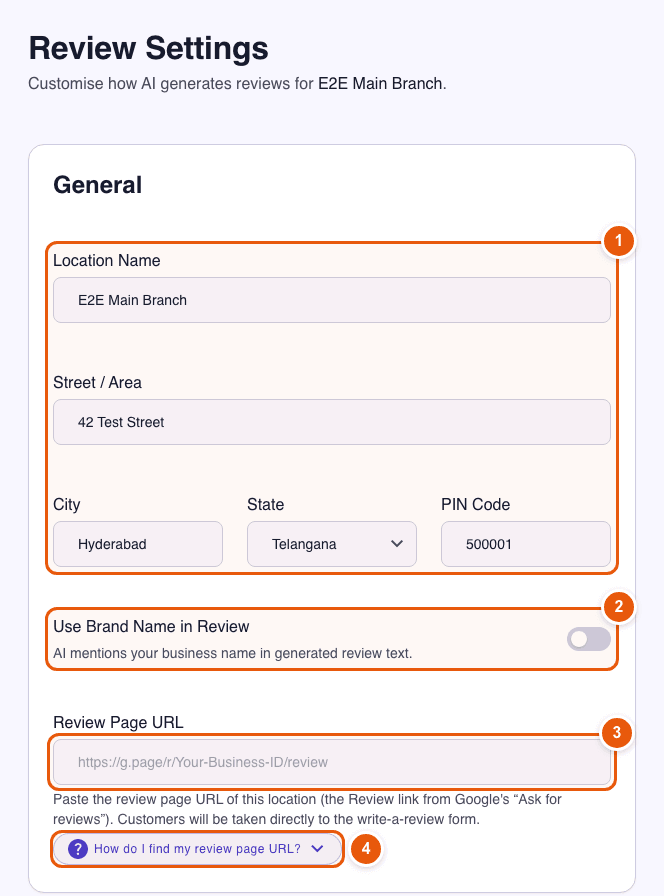
Correct basics here make the reviews more accurate and the posting smoother.
Review Settings, General section: location details, brand name toggle and Review Page URL
  1. Location details. Name, street, city, state and PIN code of this branch.

  2. Use brand name in review. When on, the AI mentions your business name in the review text.

  3. Review Page URL. Paste the Review link from Google’s “Ask for reviews” so customers land on the write-a-review form.

  4. How do I find my review page URL?. Click it for a short guide with the exact clicks.

Good to know: To change the link later, copy the new Review link from Google (see Find your review page URL), paste it here and press Save Settings. It applies to the next customer who scans.

Review Settings · AI Customisation

Tone, keywords and more

These options shape how the suggested reviews sound. Most of them are part of the Pro plans.
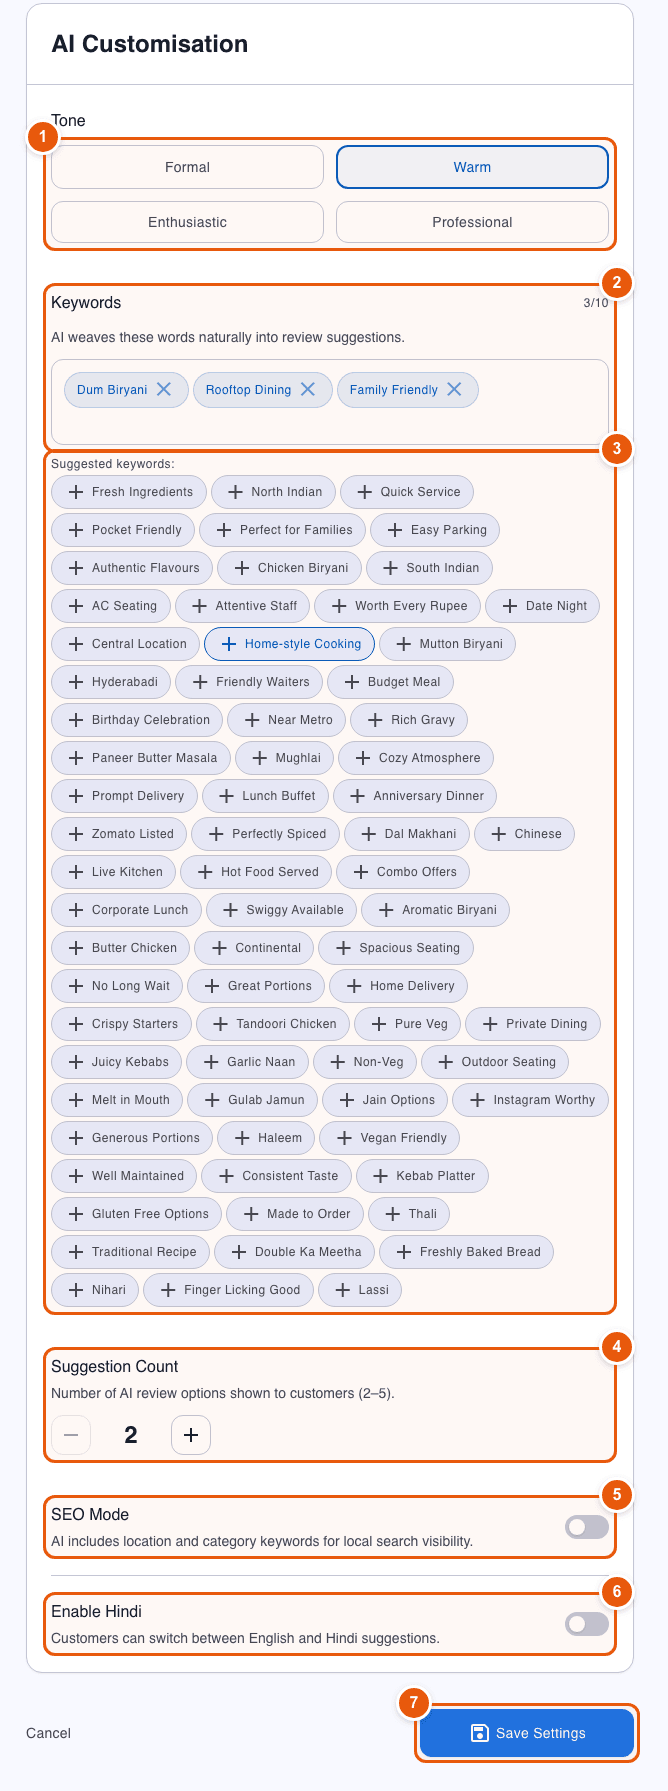
Review Settings, AI Customisation: tone, keywords, suggestion count, SEO mode and Hindi
  1. Tone. Formal, Warm, Enthusiastic or Professional. Choose the voice that matches your brand.

  2. Keywords. Up to 10 words or phrases (for example “Dum Biryani”, “Rooftop Dining”) that the AI weaves into reviews naturally. Type your own and press Enter.

  3. Suggested keywords. Tap any chip to add it. Chips are tailored to your category.

  4. Suggestion count. How many review options customers see: 2 to 5. Free includes 2, Pro includes up to 5.

  5. SEO mode. Adds your area and category keywords so reviews help your local search visibility.

  6. Enable Hindi. Lets customers switch between English and Hindi suggestions.

  7. Save Settings. Applies your changes. Cancel returns without saving.

Tip: Start simple: pick a tone and three or four keywords. Review what customers see, then fine-tune.

Part 6

Track your results

Open Analytics on any location card. Switch the time period to see short-term spikes or long-term trends.

Analytics

Everything on this page is for one location.
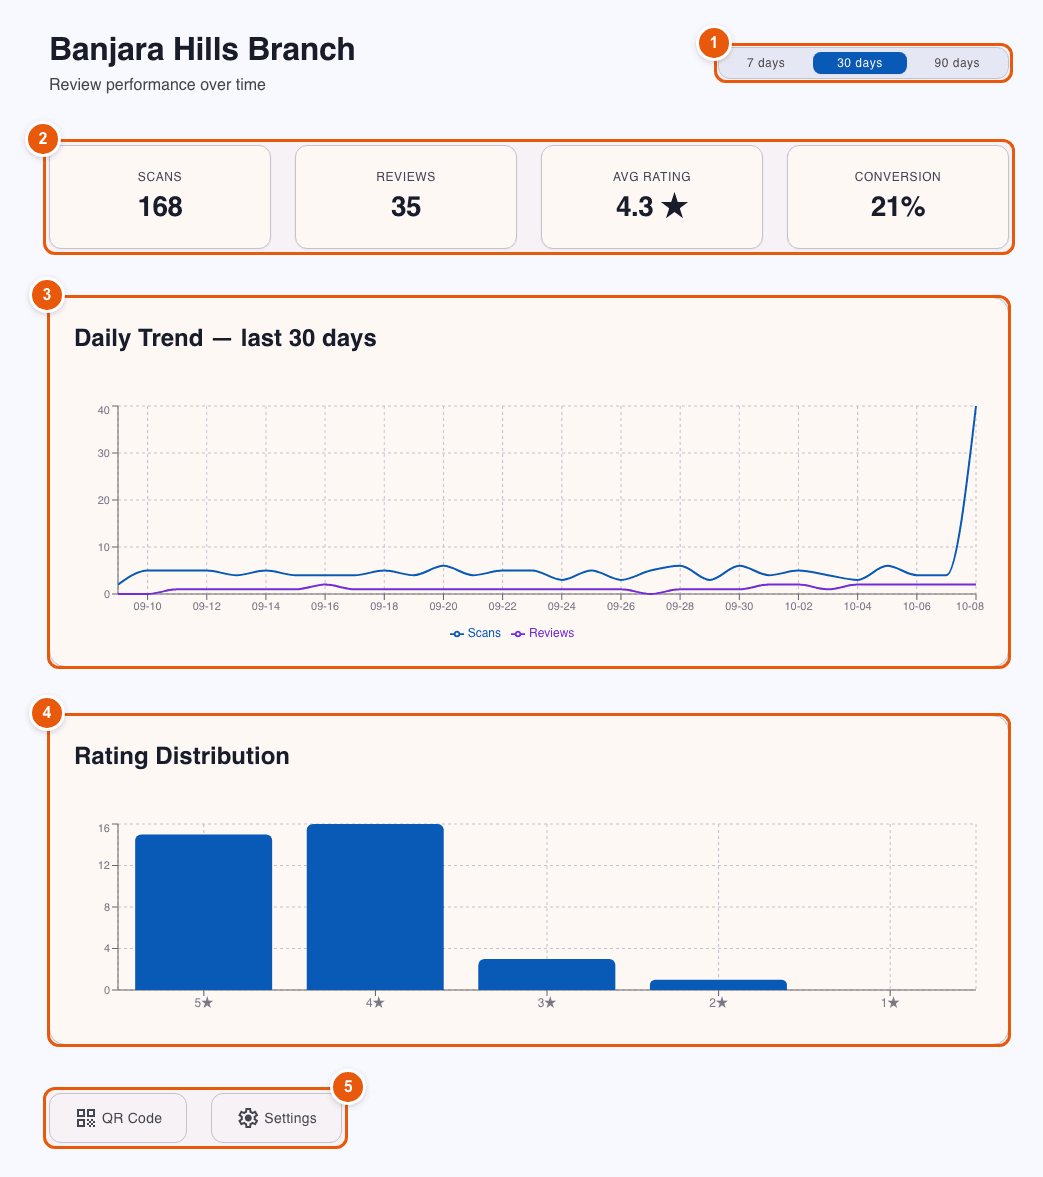
Analytics page with period switch, totals, daily trend and rating distribution
  1. Period switch. Show the last 7, 30 or 90 days.

  2. Totals. Scans, reviews, average star rating and conversion (reviews divided by scans).

  3. Daily trend. Blue is scans, purple is completed reviews. Look for the days your promotion worked.

  4. Rating distribution. How many 1 to 5 star ratings customers chose in the period.

  5. Shortcuts. Jump to this location’s QR code or its settings.

Good to know: A scan is counted when someone opens your QR link. A review is counted when a customer confirms they have posted to Google. A low conversion usually means the QR code is in the wrong place or the review page URL is missing.

Part 7

Business settings and your plan

Business settings

Open it from the dashboard with “Business Settings”.
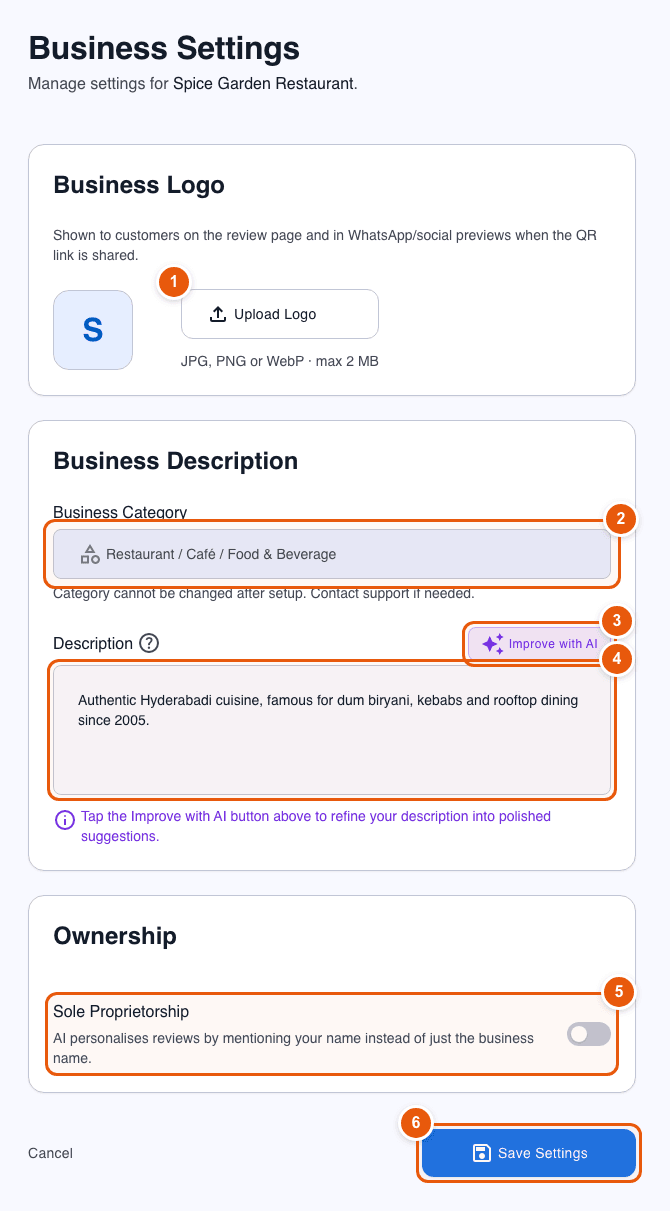
Business Settings: logo, description and ownership
  1. Upload logo. Shown to customers on the review page and in WhatsApp or social previews of your QR link.

  2. Category. Shown for reference. It is locked after setup.

  3. Improve with AI. Polishes your description into a few better versions.

  4. Description. Edit freely. It guides the tone and content of reviews.

  5. Sole proprietorship. Lets reviews mention the owner by name.

  6. Save Settings. Applies your changes.

Subscription

Open it from the Pro Plan badge or the plan prompts. You can upgrade or switch billing cycles at any time.
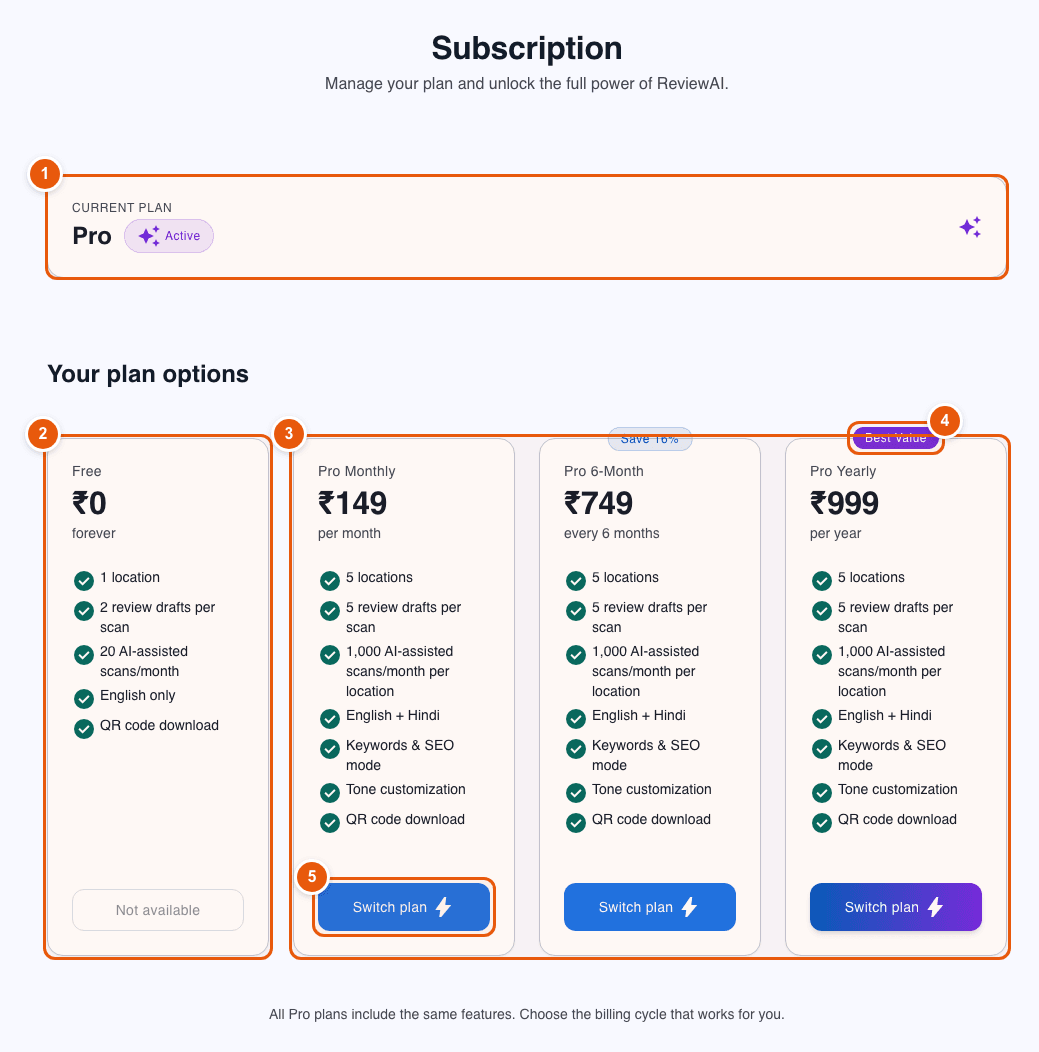
Subscription page showing the current plan and plan options
  1. Current plan. Your active plan and its status.

  2. Free. Stays available as a starting point.

  3. Pro plans. Monthly, 6-month and yearly share the same features. Only the billing cycle changes.

  4. Best value. The yearly plan costs the least per month.

  5. Switch plan. Opens the secure payment window for the plan you picked.

Part 8

What your customers see

Customers need no app and no account with you. The whole flow runs in their phone browser and takes under a minute. These screens are shown on a phone, the way customers see them.

Customer step 1

Scan and sign in

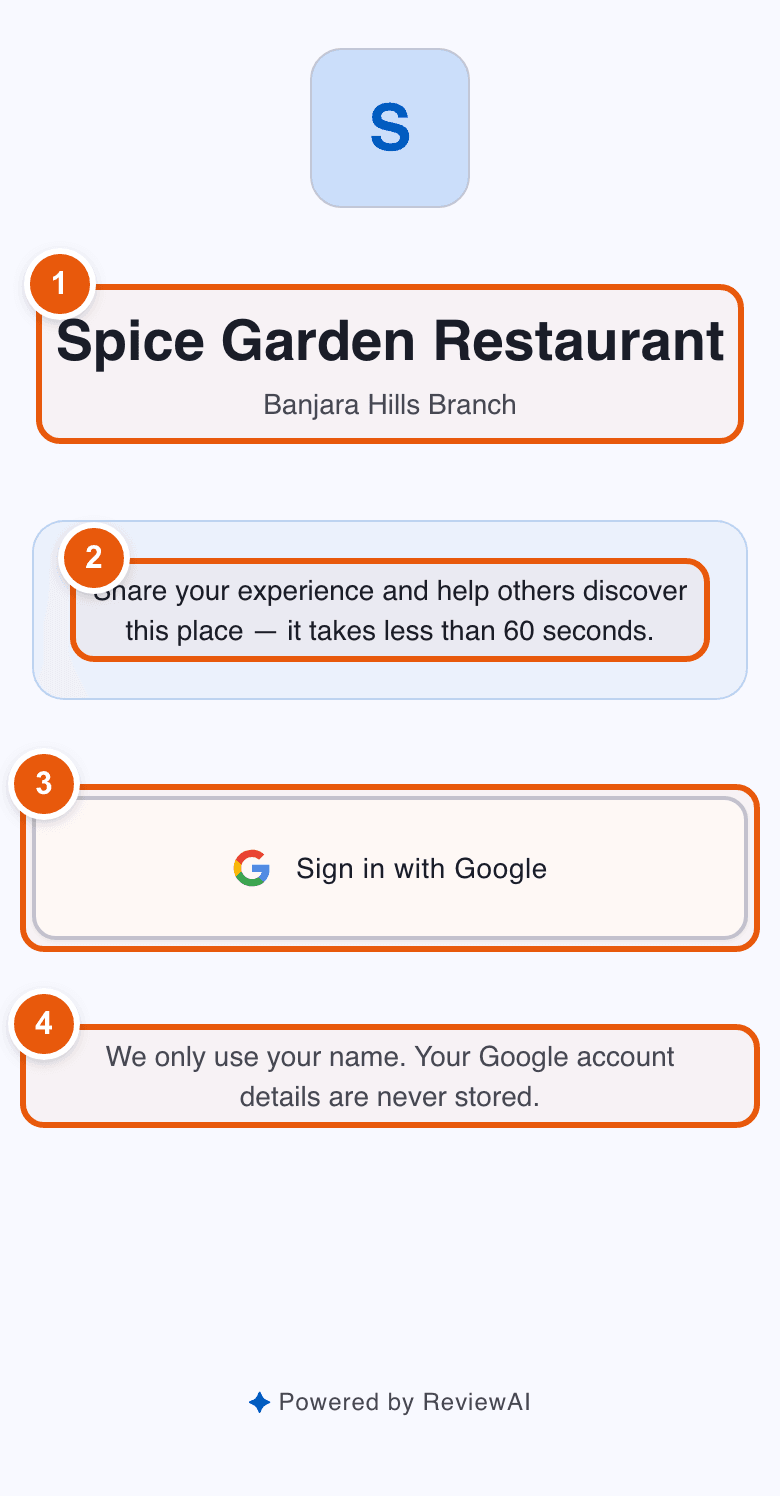
The customer scans your QR code. They see your business name and logo, and sign in with Google so each person can review once.
Customer landing screen on a phone with the Sign in with Google button
  1. Your business. Your logo, business name and location name.

  2. Friendly prompt. Tells customers it takes under 60 seconds.

  3. Sign in with Google. Needed to post a Google review anyway. It also stops duplicate reviews.

  4. Privacy note. ReviewAI only uses the customer’s name and does not store their Google account details.

Customer step 2

Rate the visit

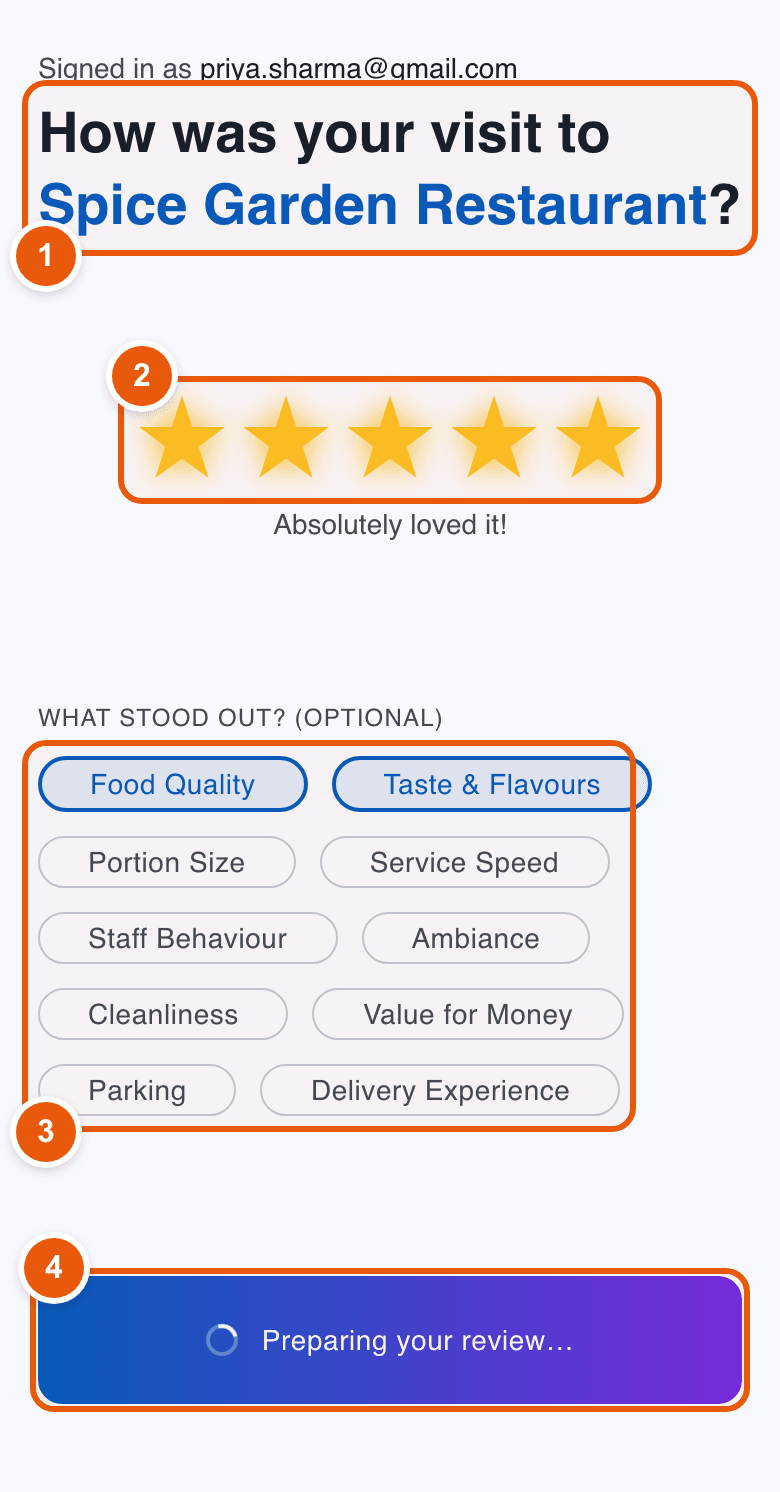
One tap on a star is all it takes. Optional tags help the AI write something specific.
Customer rating screen with five stars and “what stood out” tags
  1. Question. Shows your business name so it feels personal.

  2. Star rating. Tap 1 to 5 stars. A short label like “Absolutely loved it!” confirms the choice.

  3. What stood out. Optional tags such as Food Quality or Staff Behaviour. Their wording depends on the star rating.

  4. Preparing your review. The AI starts writing as soon as a star is chosen. Nothing else to press.

Customer step 3

Pick a review

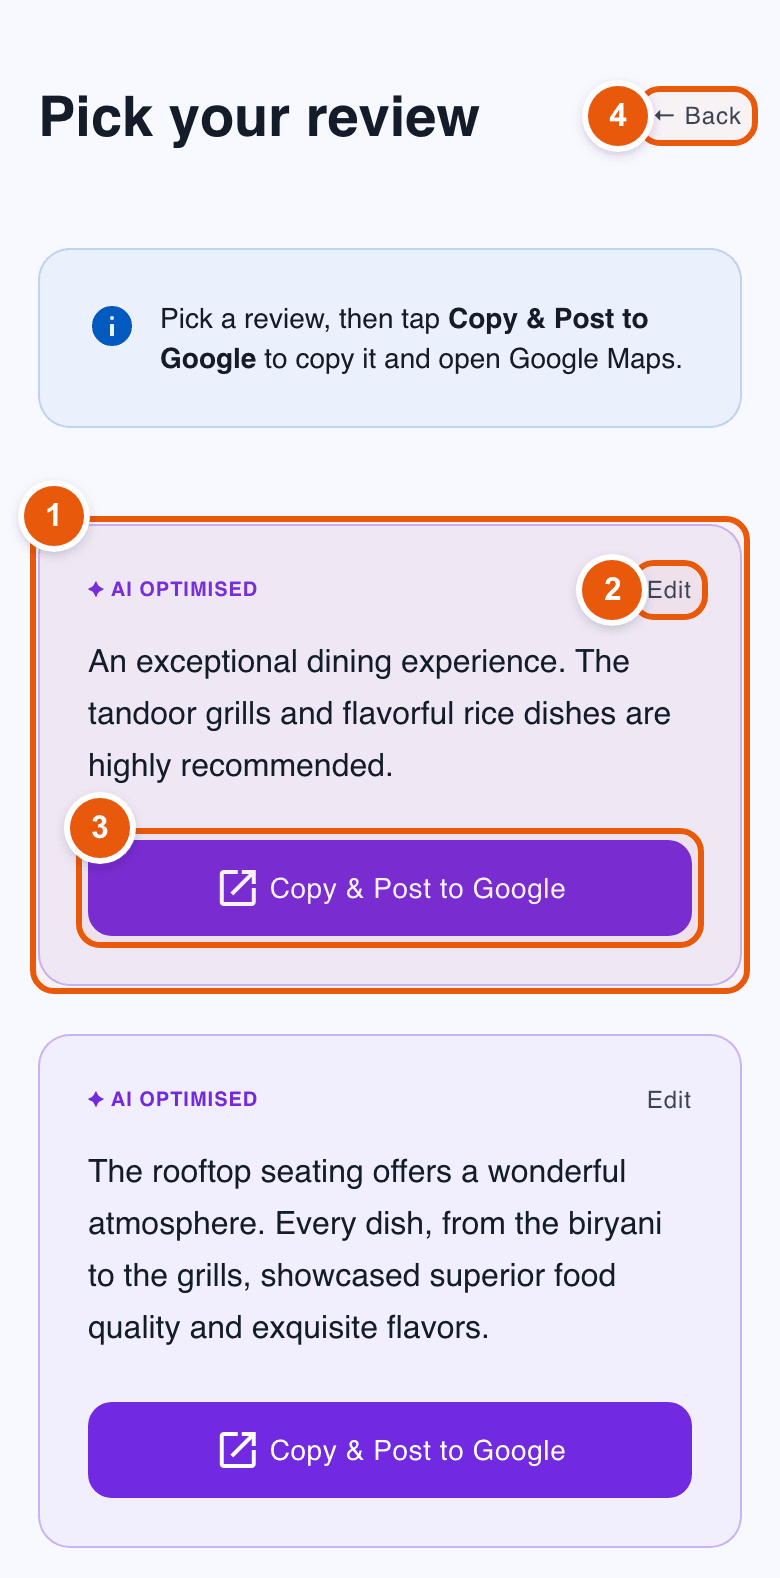
The customer sees ready-to-use reviews written for your business. The number depends on your plan and Review Settings.
Customer screen listing AI-written reviews with Copy & Post to Google buttons
  1. AI-written review. Each card is a complete review in a natural tone.

  2. Edit. Customers can tweak the text in their own words before posting.

  3. Copy & Post to Google. Copies the review and opens Google Maps in a new tab.

  4. Back. Change the star rating or tags to get new suggestions.

Customer step 4

Paste and submit on Google

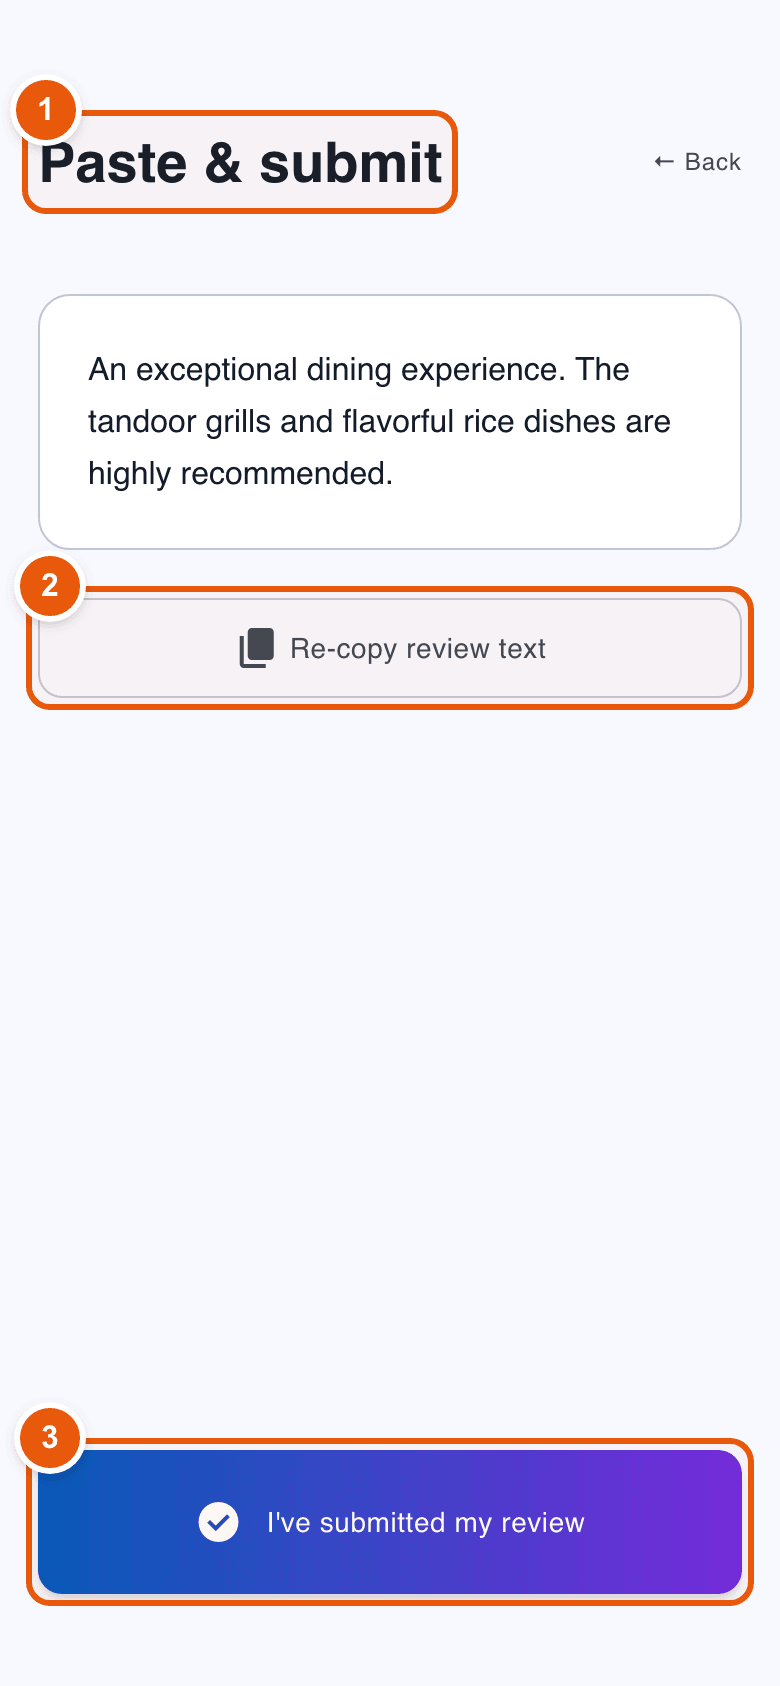
Google Maps opens straight on your review box. The customer pastes the text (press and hold, then Paste) and taps Post. They then return to ReviewAI.
Customer Paste & submit screen
  1. Paste & submit. Reminds the customer what to do on the Google page.

  2. Re-copy review text. In case the clipboard was cleared, one tap copies it again.

  3. I’ve submitted my review. Confirms the review was posted. ReviewAI counts it in your analytics.

Good to know: The Google review itself is posted by the customer from their own Google account. That keeps it genuine and fully within Google's rules.

Customer step 5

Thank you

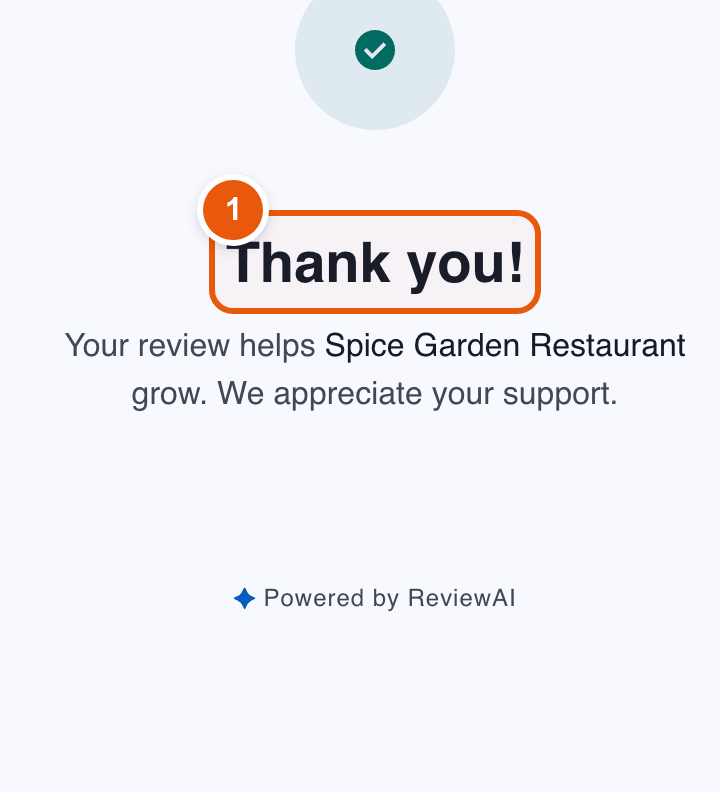
A short thank-you closes the flow. If the same customer scans again, they see an “Already reviewed” message instead.
Customer thank-you screen after submitting
  1. Thank-you message. Confirms the review was recorded for your business.

Part 9

Tips and troubleshooting

The QR code says “QR code not found”.

The code was probably regenerated. Regenerating a QR code gives the location a new link and the old one stops working. Download the current QR code from the location page and replace the printed copies.

Customers land on a generic Google page instead of the review box.

Add your review page URL in Review Settings → General. With it saved, ReviewAI opens Google’s write-a-review box directly. Without it, customers have to find your listing themselves. Here is how to copy the link from Google.

I see “Plan limit exceeded” or an upgrade prompt.

The Free plan includes 1 location, 2 AI review suggestions per scan and 20 AI-assisted scans a month. Open Subscription from the dashboard and switch to a Pro plan to raise those limits and unlock keywords, tone, SEO mode and Hindi.

Tone, keywords, SEO mode or Hindi are greyed out or missing.

These customisation options are part of the Pro plans. They appear in Review Settings once your account is on Pro.

I picked the wrong business category.

The category is locked after setup because it drives the service list and the review wording. Email support@reviewai.cc and we will help.

A customer says they cannot leave a second review.

Each Google account can leave one review per location through ReviewAI. A customer who already reviewed sees an “Already reviewed” message instead of the rating screen.

Ready to collect your first review?

Create your account and follow the steps above. Need a hand? Email support@reviewai.cc or visit our support page.

Get Started Free